Tuesday, August 31, 2010

Check software or hardware compatibility with Windows

Photo from GeekSmack.net
How many times has it happened with you that you went out and bought some software, say, a video game, sure that it'll work on your computer, because it is too old, and you find out that it is not compatible with your shiny new version of Windows?

It happens to everyone. But before you buy something, you can always check its compatibility on the Compatibility Center, a Microsoft service that is out there since a very, very long time.

You can check your new hardware, or software that you're about to buy against a huge database of certified products and you can be sure it is going to work.

Yes, you can check game compatibility here too!

Here's the Windows 7 Compatibility Center. And if you're still using Windows Vista, here's yours.

Learn more Windows tips and tricks. Learn the best way to clean up your Windows PC, free up the extra bandwidth Windows blocks and see how you can add Dropbox to the Send To menu in Windows.

Share/Bookmark

Monday, August 30, 2010

Older people using more social networks now

PewInternet, a project "that provides information on the issues, attitudes and trends shaping America and the world" has published a report recently, that analyzed the use of social networks among the Internet users aged over 50.
Photo from Born4Digital

Between April '09 and May '10, the use of social networks overall, by Internet users over fifty years of age grew from about 25% to 47%. PewInternet says that the use of social networks is highest among the younger generation (duh!), the growth in use of social networks of this generation is shadowed by the growth in the same in seniors.

That means, a lot of senior citizens all over the world are using social networking now. There is high growth in their use too. 20% of people 50-64 years world-over say that they use social networking on a typical day. An year ago, it was just 10%. That's considerable growth.


More stats, directly quoted from New York Times:
"Overall, 92% of all older adults and 89% of all seniors send or read email daily. With regards to online news gathering, 76% of older adults get their news online and 42% say they do so daily. Among seniors, about 62% look for news online and 34% say that they do so daily."

Stats aside. What does this mean? Are older adults looking for more and interesting stuff online? Or are they suggested by their younger relatives to come to Facebook and Twitter?

Hey, want something fun? Learn how to cancel a Facebook friend requests or see how to add an 'Unfriend' button on your friends' profiles on Facebook.

Share/Bookmark

Sunday, August 29, 2010

Things to do with Wolfram|Alpha when you're bored: Mix up colours

Okay, here's another one of my Wolfram|Alpha fun tips. You can mix up digital colours with it. For example, type in 'crimson + violet', obviously without quotation marks, as usual.

You'll get in return amazing, fun data about the colours, what they form together, and the hexadecimal code for it. For non-geeks, that's the code you can use for the colour in HTML coding. For the colour my example formed, it was '#E54B95'.

The results will show you the nearest named colours too. That's pretty interesting. The colour my example formed was between the shades hot pink and pale violet red. At times, they may have some interesting names.

Among a handful of other things, there will also be the amount of red green and blue in each colour. Hey, you knew that, didn't you? All the colours form by mixing up these three scientific primary colours.

Have fun with this. Also, try typing in single colours. For more colour fun (that you can use in Wolfram|Alpha, and all over the web, look at this, this and this page (each one opens in a new window or tab).


Go to Wolfram|Alpha now. Also see my other posts about Wolfram|Alpha fun stuff, like creating secret barcode messages, tracking satellites (!), look up the place that is on the other side of the Earth and much, much more in the archives.

Share/Bookmark

The secret Snake game in the YouTube player

Photo from My-Symbian.com
I don't know when this was sneaked into the YouTube player, but there's a little Snake game in there. Remember, the little game on Nokia phones? You were a snake and you had to eat the food that popped around the screen, avoiding the walls and yourself. You grew longer with each meal, and the game continuously became difficult.

That game's in the YouTube player now. Where? You ask? The next time your video stops (annoyingly) to buffer, press one of the arrow keys, and the little set of white dots that go round and round will become a snake.

You can move the little snake around. The game is really fast, as compared to the Nokia version, with the default settings. The food here is a white dot, which looks the same like the ones forming the snake. It blinks softly, and you can eat it to grow. Unlike the mobile version of this game, the snake grows pretty fast, and the food may not appear in some cases. You have to keep running around until it does.

Also, it depends on the video if you'll be able to see the food clearly. If the video is very colourful (or grey, matching the colour of the food itself) you won't be able to see it. It's fun.

Also, the game continues to play until you lose, even when the video starts playing. Sometimes, you may find the game more interesting than the video itself. Sorry, you people with really fast Internet connections. You cannot enjoy this as much as we do.

So, that's a fun little way to help users while away the time the video takes to buffer. Good thinking, Google.

Update: Here's the longest I could get...


Phineas and Ferb in the background!


Share/Bookmark

Saturday, August 28, 2010

Create a custom search engine for research

Be it school or work, everyone has to do research online some or the other time. Sometimes it is really hard to find some things. The modern search engines have been crafted in such a way (especially fueled by competition) that it makes it easier for the user to find specifically what they want.

But, search engines have a massive amount of indexed data. In some very rare cases, it makes it harder to find things that can easily be found when searched on a specific website. After all, the results are sorted by computers. Not that I say that computers are inefficient (I am the author of Right Now In Tech, duh!), they are just not conscious like us.

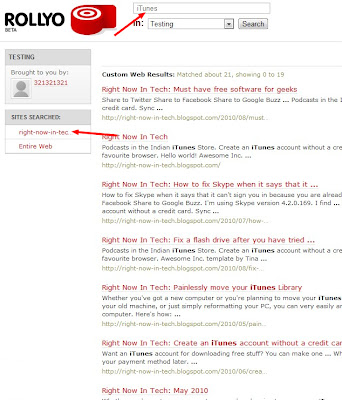
Here's a superb, but service that helps you create the very custom search engine that you need to search for a specific topic. It's called RollYo. You can also make the search engine available to others who are interested in searching for the topic, and you can use others' engines too. Now, because you need a free account to share and save your 'rolled' search engines, I recommend that you create one before continuing to read.


To get started, go to the RollYo homepage. Now, you can search online from the homepage, or you can use one of the custom rolled search engines they have created for you. 


If you notice, when you use one of the custom ones on the homepage, there is a list on the left showing the various websites that were searched. Now that's how RollYo works. You add in sites to search in your custom search engine, and then use it. In a few cases, RollYo cannot be used for research, as you need to know the sites to search in. But you can always use the search engines created by people.


To roll up your own search engine, head over to the 'Create Searchroll' page. Now, give your searchroll a name, and put in the websites to search in the next box. Optionally, you can even set a category for your search engine. Then add in some tags so that other users can use it later. If you're a registered user and you're logged in, you can select the checkbox at the bottom to let others use your searchroll.


Now, click 'Create Searchroll'. It will let you go back to the homepage, which will now have your custom engine too. Click the search engine, and enter any term(s). RollYo will search for it like any other search engine, except that it will do it only on the site(s) you entered.


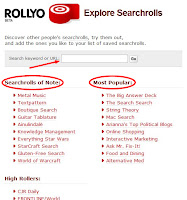
To use others' custom searchrolls, head to the 'Explore' page and see the popular search engines. You can also put in some keywords in the search bar on the top and search for a keyword for the kind of search engine you want to use.

Have fun rolling. Hope you find this useful for your research.

Share/Bookmark

Thursday, August 26, 2010

Use Google Chrome keyboard shortcuts to save time

I am pretty sure people waste several minutes everyday in using their mouse to point and click various buttons and other stuff here and there. Now, in the Internet era, most of us spend most of our computer time on our browsers. Today, I'll mention some very common, basic keyboard shortcuts that are useful in everyday navigation, and which can save lots of your time (and you can show off your keyboard ninja skills to your friends too). I am using Chrome here, but you can use most of the keyboard shortcuts in other browsers as well.

New Tab and close tab

This is one of the most commonest things you do in a web browser. Every browser now uses the tab system introduced by Firefox instead of opening new windows. To open a new tab, you simply press Ctrl+N. To open links or bookmarks, or anything you can think of in a new tab, hold down Ctrl while clicking it. But we talk about not using the mouse so much here, so forget it. You can also press Ctrl+[The Back button] to open up the previous page in a new tab, anyway. 

Also, to close the current tab, press Ctrl+W. You can move pretty fast if you use the keyboard to open and close tabs. Oh, did you close the wrong tab? Press Ctrl+Shift+W to open the last closed tab. Remember, bringing in Shift in most keyboard shortcuts generally reverses the effect.

Go Back one page

If you start counting the number of times you hit the magical Back button in a web browser in a single day, you'll be surprised. You may even find it hard to count it all. Try going through a day without using the Back button at all.... Okay, let's get to the point. You also waste time in going back if you use the mouse to do it. If you haven't clicked on a text box, or some interactive element on a page, you can use the Backspace button on the keyboard to go back by one page.

Scroll through tabs

Okay, so we talked a while ago about using the tab system so much these days. Now, it's hard to keep track of things once you have so many tabs open. So, instead of searching for the one you want by getting your hand to the mouse and moving around the screen, use the keyboard!


If you press Ctrl+Tab, you can move through tabs, from left to right, along the tab bar. Try it out. It's useful, once you get the hang of it. And you might have guessed it. You can press Ctrl+Shift+Tab to cycle the tabs in reverse order.

Scroll up and down the page

Ah, the handy directional keys! You can press the up and down button any time (when you have not clicked anywhere else, as usual) to scroll up and down the page. And if you don't like slow things, use the Page Up/Page Down couple to scroll by entire pages.

History/Downloads

If you use the history to visit the sites you visited earlier, you need to open it quickly too. It takes a very long time to go through the menus to open this one. So, if you know the right key combination, it will save you a lot of time. Same goes with the Downloads page. Once you have closed the downloads bar at the bottom of the browser (in Chrome), you need to go through the menus to see the download progress. Also, the download speed is shown only on the Downloads page.


It's simple. Hit Ctrl+J for the Downloads page. It does not make sense, but Ctrl+D is used for bookmarking a site, so you have to get the hang of it. For the History page, press Ctrl+H. That one's fine.

Move to address bar

If you don't use this, you surely waste about half an hour per week clicking the address bar to type in a website URL. This one's simple, and I know that this one works with a lot of browsers. Hit Ctrl+L to focus on the address bar. You can quickly start typing the address you want to go to.


So, that was a lowdown on the basic, navigational keyboard shortcuts to use in Google Chrome, and some of them in other browsers too. Hope you have fun. You have grown a step closer to becoming a keyboard ninja. Oh yes, and remember, you can always combine keyboard shortcuts to create new ones. Be experimental and explorative.

Stay tuned for more tips and tricks and be sure to check out my other posts in the archive.


Share/Bookmark

Why you should have a good email address

People have all kinds of email addresses. How about you? However, you need to have a good, sensible one, because they tell a lot about you...


Okay, AOL and Y! Mail users, take it with a pinch of salt.

Created by The Oatmeal.


Share/Bookmark

Wednesday, August 25, 2010

Beginners' Guide to computer maintenance

Cleanup is a must step in the maintenance of anything. Computers are no exception. Yes, it is very important to clean up your hardware in order to keep everything running as new. But it is also equally important to clean the computer from the inside, i.e. the software. There are many steps in maintaining a computer. I outline the main things, also mentioning recommended software and why it needs to be done. Read on...

Cleanup

Cleanup? What does that mean? Well, by this, I mean cleaning up all the gunk your software creates as you normally use your PC. Some beginners will go "What? I use my computer everyday, like all people do. Why will that create junk?"

Well, it does. And we need to keep things clean to maintain peak performance. One of the most common ways is using your web browser. This does not mean that you should not surf. The problem is that browsers cache all the data you see online for some time. Most browsers allow you to set the amount of hard drive space to allocate for the cache. When you see something, the browser downloads the content on the webpage, and it stores it in a temporary folder so that it can display it quickly if you visit it sometime soon. Other things may include small titbits that are saved by other applications you use. Even the thumbnails that are shown for images in a folder are saved, taking up disk space.

Doing it:

There are many ways to clean the junk files up. You can use the Disk Cleanup program that comes included in Windows. It's a simple program that does just what it says. You can start it from the System Tools folder in Accessories inside the Start Menu. It is safe to delete the following things:
  • Temporary Files
  • Recycle Bin contents (unless there is something inside which you may need later).
  • Thumbnail files
  • System error memory dump files
  • Queued Windows Error Reporter stuff
  • Temporary Internet Files
Disk Cleanup does a pretty good job. But it does not have everything. I recommend using the free CCleaner (and others do too) because it is easier to use, and does a better job. More than that, it can clean up your registry, which we will discuss later in this post.

CCleaner


Defragmenting the hard drive:

This is one concept very few people know about, though they have heard of it and know that it is useful. So, here's the lowdown...

Your hard disk organizes data on it in sectors. The round disk inside it is divided digitally into portions called sectors. The data on the drive is stored in these sections. But, that doesn't mean that long chains of data are clunked up altogether. A large program that you have may be sprawled up around the entire drive. When you add new things, and especially when you remove things, some sectors may get pockets of empty space in them. Imagine air bubbles in a clear film of liquid. Thus, the drive is fragmented. Thus, to maintain peak performance, you need to clean the drive up. This will help the computer to find data more easily, making it run faster. You may also get some free space as a feather in the hat.

Doing it:

For this too, you get a program pre-installed with Windows. It's called (very aptly, and minimalistically) Disk Defragmenter. You can do a pretty good job with it. It is located in the System Tools folder, just where Disk Cleanup is. You just run it and it analyzes the hard drive. In Windows Vista and 7, it does not graphically show you the fragmentation as it did in XP. But it tells you if you need to defrag the drive. I don't like it so much, though, and I recommend using the free Defraggler from the makers of CCleaner. It shows you all the things you need to know, including a graphical fragmentation graph. It also tells you the percentage of fragmentation and more.


Registry optimization:

The Windows Registry is a place that will give you nightmares. It's a place where all the settings for many programs and other little things are stored. If you do a lot of installing and uninstalling and still go without cleaning out the junk from the registry, you sacrifice much of your computer's real speed.

Unfortunately, Windows does not come with a registry cleaner. You have to download a third party app for the job. Again, my recommendation is the free, light and reliable CCleaner (did you know that it can be carried around in a flash drive too?), though you have a lot of free options available online. Oh, and if you want a glimpse of the Windows Registry, type in 'regedit.exe' in the Run... box (or in the Start Menu search box in the newer versions of Windows) without the quotes and run it.

Doing it:

It is always good to have a backup of the entire registry once you are ready to clean it up or if you're modifying it. Though it is recommended, I never do it, and I have never gotten any kinds of problems. CCleaner can back the registry up for you, anyway, so no problem. You tell the app to clean it up and you'll be done. You don't need to remember anything else.

Uninstalling unused apps:

This one is a no-brainer. You are recommended anyway to delete the programs you're not using. This will free up some hard disk space, your computer will have less things to take care of, and you won't have any kind of clutter on your computer.

Doing it:

There's nothing to explain here. You just go to Control Panel, and go to Add/Remove Programs in the Classic View. You then mercilessly go on deleting apps you do not use. You can use some other uninstallers available out there to clean up more persistent programs, or to clean up more properly.

Checking for malware:

Your computer may not run properly or run slower than usual if you're infected with malware. This may include all kinds of adware, spyware, trojans, worms, viruses and other stuff. At times, some of them may even send out your personal data to the owners, and some may use your computer to send out spam emails. You can use one of the many paid and free anti-virus apps to scan and remove such software.

Doing it:

These things are generally not worth the brouhaha as some people might think and they can be removed fairly easily. I recommend using one of the following programs for the job:

Norton AntiVirus
Norton 360
Norton Internet Security
McAfee Anti Virus
AVG Anti-Virus Free Edition (FREE!)
Avast! (FREE Available!)
Avira AntiVir (FREE Available!)

So, these were the basic things one must do regularly to maintain their computer, and keep it running perfectly, as it was when new and shiny.


Share/Bookmark

Tuesday, August 24, 2010

Must have free software for geeks

Are you a techie? Love gadgets? Computer expert? Like hacking and tweaking software and hardware? You're a geek. Believe it or not, you're pretty much like me. Okay now, let's not fight over the definition of a geek.

Here's a list of software (all free) for geeks, according to me. You can download each by clicking its name:

Firefox/Chrome: These top dogs in the web browser world are not only recommended for everyone, but also they are a geek's playground. If you use Internet Explorer and you consider yourself tech-savvy, think again, then think again, and think until you've got one of these browsers installed.

Notepad++: It's another must have tool for a geek. The Notepad included in Windows is fine. It's simple, full-featured for web design and it has everything a normal person needs. But you're a geek. You should have Notepad++. It has color coding assistance when you're web designing, it has more features and whatever you can think of. Oh yes, and it's open-source.

Dropbox: Wow, the perfect file synchronizing tool. It's the ultimate choice (especially for geeks, once more) for sync and backup. It's not completely free, but there are not many limitations. The free account gets a decent 2 GB of online storage, which you can expand with a fee, but I never felt a need for it. You can also get an extra 250 MB for completing the tutorial, and more free space with the instructions here. Dropbox is magical. You can upload any type of file, no matter what size (unless it exceeds the size on your account), and best of all, it behaves like any other folder on your computers, with the added functionality on constantly synchronizing.

7-Zip: WinZip is so old fashioned. It even isn't free. 7-Zip is little, light, and open-source, making it completely free. Windows comes with a fine file extractor. But it cannot extract the newer, better compressed file types. 7-Zip expands the capability by integrating with your OS and it can extract almost all kinds of compressed files. It's the ultimate compression utility.

µTorrent: Hey, come on, torrents are not illegal. It all depends on what you're downloading. Torrents can be very useful for downloading large software, and if you are a geek, you need to know torrents. µTorrent is the best torrent app out there. You need to have it. You may need it when downloading large open-source stuff, like OpenOffice, or large versions of Linux (see, I talk about only free software here).


TeamViewer: How can a geek live without this? TeamViewer, if you've never heard of it, is a remote access and remote support software. You can use it to impress friends, and/or help them when they're in trouble and need some of your geeky expertise. It's free for commercial use, and there are no limitations. When you have TeamViewer, you can easily tell the person on the other side to download a smaller version (or the full featured one) and you'll be able to use their automatically generated user ID and password to log in to their computer and find out the problem. I, personally, have never used it for remote access to my computer.


GIMP: The free open-source GNU Image Manipulating Program. This is arguably the best free photo editing tool and is (even more) arguably a good Photoshop alternative. Okay, Photoshop fans, don't clobber me for that. The only catch is (no, it's free, and full-featured) it has a slight learning curve. You may find Paint.NET better if you're not so much into photo editing (which I use most of the time).


CCleaner: The geek's choice in computer clean-up utilities. It can clean up all the gunk Disk Cleanup cleans, plus much of the stuff other apps leave behind. It can also clean the registry and work from a flash drive without any problems, for use on others' computers.


So, these were the very basic freeware a geek must have in his/her arsenal for everyday computing. Did I miss something important? Throw it into the comments, and I may add it into the list.

Share/Bookmark

Things to do with Wolfram|Alpha when you're bored: Compare websites

Long time since I posted fun things you can do with Wolfram|Alpha. Here's one more... You can compare the traffic and other stats for your favorite websites. Just type in:

Google vs. Facebook
Hit Return and sit back. Wolfram|Alpha will fetch the data for you.

You'll now find the approx. site hits, hits by different visitors, and even the approx. site rank on the web. As you can see in the photo below (click it for a larger version) that Google is the top visited website on the Internet and Facebook is the second. Wow. They are two successful Internet start-ups. Really.


Compare more sites, and if you get something interesting, add it in the comments below! Oh yes, and you cannot use Wolfram|Alpha to analyze your hosted blog (like WordPress, Blogger, LiveJournal, Tumblr or whatnot).

Remember to check out my other posts in this series in the archives. They're fun. You may learn how to mix up digital colours, see what place is directly opposite to you on Earthlook up where your favorite satellite or space probe is right now (or the International Space Station) and much, much, more.

Visit Wolfram|Alpha now.

Share/Bookmark

Add touch screen support to Google Chrome

I have an HP tx2000 series convertible tablet PC. I had once switched back from Chrome to Firefox because Firefox had an add-on for touch scrolling, called Grab and Drag. Chrome didn't have such an add-on. I could not scroll by touching anywhere on the screen, so I stayed with Firefox. But now, there's a Chrome extension too, that let's you do just the same.

It's called chromeTouch, which you can download here. After it's done installing, it's pretty straightforward and easy to set up. You see a new icon in the address bar (which you can remove):


Now, click the Settings button, and go to Tools -> Extensions (I'm on the beta, and it could be different on the stable version, but you need to get to the page with all your extensions and the settings for them).

Here, click the Options link under chromeTouch. You can set all the various things. Remember, let the mouse button setting be 'Left', because it won't work when you scroll using your finger (that's a stupid setting, right?). I also recommend keeping the Touch Mode to Auto, which means that the scrolling won't work when the pointer is on text (for selection). You can change it easily by clicking the icon in the address bar too.

Rest of the settings are fine by default. Enable the mouse gestures thing if you want. You will be able to go back or forward by flicking left or right.

Have fun.


Share/Bookmark

Friday, August 20, 2010

Use the Windows bootloader to boot Windows and Ubuntu

You find GRUB ugly right? Everyone does. It's supposed to be better and cleaner, but it is so restricted and hard to edit. I am here to the rescue! You can easily use the Windows bootloader to boot into Windows or Ubuntu, with no hassle.

I am using Windows Vista Home Premium, and I am sure it works with 7 as well. But still, I can't think why it won't work in Windows XP as well. In my case, I have Ubuntu 10.04 installed on a second partition, and both the operating systems are running properly.

The fix is pretty easy. You just go to this website when running Windows and download EasyBCD. It's a very small and useful app. When this article was written, the latest version was 2.0.2. Now, when the installation is done, run it the program. Now click the button on the left that says 'Bootloader Setup'. Here, under MBR Configuration Options, choose the relevant radio box, depending on which version of Windows you are using. Now click 'Write MBR'. After a few seconds, you're done.


Now, go to Add New Entry. Here, under Operating Systems, select the Linux/BSD tab. Now in the drop-down menu, choose 'GRUB 2' (don't worry, this will cause the GRUB menu to appear when you select this option, but we'll fix that in a minute) and name the option appropriately. Click 'Add Entry'.


Click the top button on the left, that says 'View Settings' and check if the two OSs are in the list. You may now close down EasyBCD and reboot your machine.


Now, if everything went well, you must get the Windows bootloader when you start the computer. You must see the two operating systems, as you named. But, the problem? When you choose your Linux option, you get the GRUB boot menu. You don't want that to happen. So let's change a little setting in Linux, so that the menu is not displayed at all and you boot directly to Linux when GRUB starts.

So, the effect will be this: You start the PC, you see the little splash screen (maybe not), and you see the Windows bootloader. You may choose Ubuntu or Windows and directly boot into it.

For this, we need to change the waiting countdown to 0 seconds for GRUB, so that you can boot directly into Ubuntu, when you choose it from the Windows bootloader.

In Ubuntu (10.04 in my case, as I mentioned earlier), first start Terminal (if you're a beginner, you can find it in Applications -> Accessories -> Terminal. Now, you need to run it as a 'root' user (which is similar to having an elevated window in Windows, except that this is a super elevated user). For this, type in the Terminal window:

sudo -i


Now, it will ask you your password. Type it in (don't worry, nothing's wrong, you won't see anything getting entered into the window and that's normal). Press Enter. Now you'll see 'root@[computer name]:~#' Type in:

cd /etc/default

Then, key in:

gedit grub

What we've done now is that you changed the directory in the Terminal to the folder '/etc/default' and you're now opening the text file 'grub' located there in the app called Gedit at root level. Now, when the text file is open in Gedit, change the line 'GRUB_TIMEOUT=10' to 'GRUB_TIMEOUT=0'.


This will cause the 10 seconds countdown in GRUB to become zero, and you'll boot into Linux as soon as GRUB starts.

Close the file, saving it. Now, in Terminal (open it again and get to 'root' level if you have closed it), type the command:

update-grub

In a few seconds, the settings will be applied. Now, reboot the computer and see if everything works. You should be able to get into Windows or Ubuntu from the Windows bootloader, and change the settings for the default OS, countdown and other things from EasyBCD, which is installed in Windows.


Update: If the GRUB menu is still displayed, edit the 'grub' file again, and set the timeout to 0.10 instead of a zero. The GRUB menu should not appear now.


Share/Bookmark

Tuesday, August 17, 2010

Sync Google Docs with your Dropbox using Syncplicity, for free

Maybe you use Dropbox for several documents. But you want to access them easily from anywhere, and you don't want to download it to anyone else's computer. You have probably fallen in love with Dropbox and you don't want to switch over to anything else.

When you think of accessing and easily editing documents from anywhere, the first thing that comes to mind is Google Docs. You can use your simple Google Account to get things done anywhere. You can even collaborate with others live, and work on documents. You cannot do that with conventional software that installs on your computer.

Here's my set-up:


Okay, so to make things completely clear, I keep many documents that I am working on in my Dropbox folder. This syncs automatically whenever I edit any of those with the free OpenOffice.org that I use. Now, I want to try out Google Docs, and I don't want to upload manually all the files. Also, I don't want to leave Dropbox.

Here's what you need to sync Google Docs to your Dropbox folder:


Now because you're using Dropbox, you sure have a Dropbox account. You will surely need a Google Account, which you need to have anyway if you are an ardent Internet user (others may not have it). What you require apart from this is Syncplicity.

What is Syncplicity?


You probably said, "Hey, come on, what's this stupid thing now?"

Syncplicity is a straightforward alternative to Dropbox, which happens to sync with Google Docs optionally. The downside is that it is a pretty more complex to use, and that like Dropbox, it isn't completely free. Both Dropbox and Syncplicity offer a free 2 GB of online storage. You can switch to using Syncplicity instead of Dropbox if you want too.

Here's what you do:


Now, what you do is quickly head over to the Syncplicity website and choose the Personal Edition. Select the 2 GB free plan (Note: if you are going to sync a larger amount of data, sorry, you need to pay.


Now, you will be told to create an account for yourself and install a little 2 MB software to sync. After you are done installing, you will be guided through the first time set up. After that is done, you should select the folders you want to sync. You can select your Dropbox folder, or any specific folders inside it. Then, Syncplicity will sync for the first time. It may take some time, depending on the total amount of documents you have.


Now, when this is done, you are ready to link your account to Google. For that, head over to the Syncplicity website once more and log in using the boxes on the top right. Now, when you're logged in, click the Google Docs section on the navigation bar in the website.

Now, click the button that says 'Link to Google Docs'.


When you click it, you may be prompted to enter your credentials. When you're logged in to your Google Docs account, Google will say something like, "Hey, you know what? This thing here called Syncplicity wants to access your data. Do you want to allow it to do so?" Now, obviously, if you want everything to work, you have to allow access.

When that's done, you will be redirected to the Syncplicity website, which will look similar to this:


Conclusion:

You're done! Congratulations. Your Dropbox folder is synced to Syncplicity and your Syncplicity account is synced to Google Docs. You still use Dropbox, and you will also have the privilege to edit your documents (or spreadsheets and presentations) on Google Docs, and still be able to sync it back through Syncplicity to Dropbox.


Share/Bookmark

Nikon S1100pj, a camera with a projector, now leaked

All the websites say that the Nikon S1100pj has been leaked, and it has an improved projector. Seriously, I never knew there were such cameras out there.
Credit: Gizmodo

Wouldn't it be so nice? You have this 14 megapixel camera with a 5x zoom and you snap lovely photos and videos with it. Then you return home, and you want to watch everything on a large screen with friends or family. What do you do? You may be in a hotel without an HDTV. You just turn on the camera and there it is! Everything on the wall! Wow.

The Nikon S1100pj can record in 720p, sorry, no 1080p. How much do you expect to get for $350? But anyway, the camera has image stabilization too.

And hey, want more? The camera boasts USB projection! Whatever is on your computer screen can also be projected onto anything upto 7 feet away! There it is! A perfect camera, with PC projection inbuilt!


Share/Bookmark

Friday, August 6, 2010

Fix a flash drive after you have tried using the Flow version of Chrome OS

Ok, so I installed the Chrome OS on my flash drive using Flow by Hexxeh. Now, I wasn't using it much, and I thought of installing a fast booting OS on it for travel use. I chose Slax and downloaded it. Now, I formatted it and  attempted to install it by extracting it to the USB key and making it bootable with a little thing included in the package. I did it with no problems. But when I tried to boot from it, I got Flow.

I thought that this flash drive is destroyed. But I have always known that USB drives cannot be damaged completely with just software. I attempted a research online and with a lot of rummaging through peoples' blogs and other websites, I found a solution. I decided to write it in an easy way and post it here so that people can find it easy to understand. I have divided this post into sections:

  • The problem
  • The software needed
  • The solution
Now, fixing this flash drive isn't a big problem. I have understood that as long as you're running Windows, you can easily fix it, with just basic computer knowledge. So let's get started...

The problem:


So, this is the scenario:

I installed Flow as I mentioned above, and because you are reading this, you have done that too, probably and are stuck with the problem like me. Now, when I insert the flash drive, Windows detects it as a single drive. I have a 4 GB capacity in it, and I noticed that it says that its capacity is just 250 MB right now (even after the formatting).

I checked the flash drive in Ubuntu, with GParted (the hard drive management and partitioning tool included in it). First of all, Ubuntu mounted the thumb drive as two different drives first of all, and I knew that its life was in real danger.

Fine, so I started GParted, which is an amazing (really, I mean it, it's amazing!) tool, and I checked the thumb drive. What I saw shocked me. I had about a 2 GB partition, and one really small partition (I think it must have been 250 MB). What I was surprised to see more than anything else was that there was a huge chunk of unallocated space. I tried merging the partitions and stuff, and I found that it was protected. There was no way of doing anything. I made a partition out of the unallocated space and I couldn't do anything with that either (now I had three partitions. Oh, God!).

Finally, what I am left with is: three partitions on the drive, with two of them protected, one of the two being about 250 MB, and the only one that Windows detects.

The software needed:


Now, you just need Windows, which can format the drive by itself. I am running Windows Vista, so I don't have screenshots of other Windows versions, but I assume that you must be an expert enough to format a drive with Windows XP (because you wandered off to try Chrome). You also need another little app (that doesn't need to be installed) with Windows. You can download that over here. Just extract the zipped folder and you're good to go.

You just need to run the little app called 'BootIt' with the flash drive plugged in.

The solution:


So, let's get started. You just plug in the USB drive. Now you run BootIt. Don't worry, the tool is probably not built to do what you are telling it to do, so it may show very wrong details about the USB key, so don't worry. Just select the drive and hit the Format button there.


Now, in the process, the computer may detect the flash drive as a new device connected and it may ask you what you want to do with it.


Now, just close that AutoPlay window and let it continue. Now, when its done, it may ask you to disconnect and reconnect the pen drive. You don't need to, however.


Now, just head over to 'Computer' (or 'My Computer' in older versions of Windows). Find the removable device and format it again. You will now notice that Windows will detect its full capacity again, if things have gone fine. Let the process complete normally.


Voila! You're done. The flash drive is back to normal. Congratulations!

Now do whatever you want with it. Install some portable software or a flash drive Linux on it like Damn Small Linux, Puppy Linux or Slax. Stay tuned for more stuff on this blog.

Share/Bookmark

Wednesday, August 4, 2010

Drag and drog to save GMail attachments

Drag and drop is one thing that saves your time, anywhere where it is utilized on a computer. Now GMail is the best email service for computer geeks. It offers a plethora of useful features, keyboard shortcuts and stuff. You could earlier drag and drop files to attach to email (and then hit the 'Send' button to automatically send the email once the file has uploaded and go make some coffee meanwhile). Now, you can do the reverse.

The GMail blog wrote that if you are using Google Chrome, you can even drag and drop the attachments from the email to your computer, and save it like that. No need to click 'Download' and save it somewhere.

When you mouse over an attachment in an email that has come to you, the tip box says 'Click to view OR drag to your desktop to save'. That's a little timesaver.


Share/Bookmark

Microsoft Office can be installed on two computers

If you didn't know this, any single license of Microsoft Office is eligible for installation on two computers. Neowin.net has people who read the fine print, that is the boring 'Terms and Conditions' of MS Office. Careful reading shows that you can install a single copy legally on two devices.


Microsoft calls one computer the primary computer. That may be your desktop (if it's a laptop, that's fine too). The second computer you can install it on is your portable computer. This is the laptop or tablet that you carry around with you.

So from now on, be sure to read the license agreement. You may find some unexpected discounts, privileges or refunds hidden in there.

Oh, and another little thing. Microsoft Office Home and Student 2010 can be installed on three PCs.

Share/Bookmark

Things to do with Wolfram|Alpha when you're bored: Space probes and satellites

I'm actually posting these Wolfram|Alpha fun tips in a row. This is the third one in the series. If you are like me, you'll find it fun. You can actually use the computational knowledge engine to find info on satellites orbiting our little planet, and also space probes that humans have sent out with expectations of finding alien life, or whatever.

So, this is simple. You just go to Wolfram|Alpha and type in the name of a satellite. In my example, I key in 'ISS'. It intelligently interprets it as the International Space Station.


You can enlarge the photo above to enlarge it. It not only shows the countries who built it, but it also shows the current position. It even showed me a map, with the ISS plotted on it, and it even indicated the orbit it follows.

Okay, now for the space probes. I entered 'Voyager 1' in the search bar. This was even more amazing. It showed some really awesome stats. It showed the distance of Voyager 1 from the Sun, from Earth and it showed the heliocentric velocity. Now for the fun part. The last thing in the results was the current sky position from my own location. Voyager 1 is not visible from my location, but if you happen to know a recently launched probe, and you happen to have an observatory (or a powerful telescope) at your disposal, Wolfram|Alpha can be useful for your sightseeing.

Visit Wolfram|Alpha and let me know some fun tips and tricks in the comments. You can also check out fun Wolfram|Alpha stuff in my archives and learn how to look up IP addresses and track websites, mix up colours, and compare website traffic. And there's always more, and coming...

Share/Bookmark

Tuesday, August 3, 2010

Things to do with Wolfram|Alpha when you're bored: IP Lookup

I just wrote my first post on doing stuff with Wolfram|Alpha when you're bored. This is a new series by the way. This is another fun thing you can do with the powerful computational knowledge engine.

You can use it to look up IP addresses. Well, it doesn't sound like it's fun, but it gives you the physical location of the device and you can display it on a map too. You have to put in the Internet IP address, not the home network IP address of your computer or Wi-Fi enabled phone. Another fun thing is that you can actually write in a domain name in the bar and watch the fun things that come up. When you put in an IP address, the result looks something like this (click image to see a bigger version):


If you click the link 'Show map', it even plots the location of the IP address on a map.


Well, I don't encourage tracking people using Wolfram|Alpha in anyway, and I make it clear.

Okay, so you suddenly want to look your own IP address up? Ask Wolfram|Alpha 'Where am I?' and it will give you a perfect answer. Don't worry. No one is tracking you. All the websites you visit (almost) track your IP address. Probably even my site. Don't worry about anything.

Okay, enough IP addresses. Try looking up a domain address. You'll get the location, and you can see it on a map the same way also. Here's an example of that:

Remember that you can click the above image to see it more clearly as well. Wolfram|Alpha detects the domain, and looks it up. Apart from showing you the location, it also shows you other details about the site, including the site rank, by number of visits (Wolfram|Alpha thus shows us that Google is the most visited site on the web).

Now Wolfram|Alpha proves to be a pretty good companion, no matter what you're doing. Let me know how you use the service in the comments below. Have fun with it!


Share/Bookmark

Things to do with Wolfram|Alpha when you're bored: Create barcodes

Writing after more than a week. I was travelling. Anyway, I am planning to start a fun new series of posts, which you understand by the title. I will cover various fun things you can do with Wolfram|Alpha, when you're feeling bored.
If you don't know what this Wolfram|Alpha thingy exactly is, you live under a rock! It's a still-under-development-but-pretty-powerful online computational engine. It is not to be confused with a search engine. What it's supposed to do is to interpret our language and understand questions. Then it has to get data from various sources and answer it. It has some great fun stuff and useful tools built into it. You can also use it to pass your time, if you want. There's no harm.

So, here's the first in the series: Creating barcodes.


Wolfram|Alpha is an awesome tool. It can actually code any kind of data into barcodes. Easily put, if you type:

"barcode 'anything'"


Replacing the 'anything' with a string of numbers or letters, you get a barcode as a result. Go ahead and try it. You'll get a result like so:


So? Not such a great pastime? You can actually put it to use. You can use it to leave messages for someone. You can snap a screenshot of the barcode from the page, and save it somewhere. The other person can decode it using a barcode scanner in a phone. Android phones have it, and you can download free barcode scanning apps for almost any kind of phone. It needs to have a camera, duh! Even Symbian users aren't left out here. Try the free UpCode and Kaywa Reader if you are stuck on Symbian like me.

Probably you'll find more different uses to put this barcode creation to use. Let me know in the comments! Try scanning this barcode:


Share/Bookmark